
Also known as part one of "biting off a bit more than I can chew" and maybe more honestly, "how to do sufficient investigative work to even know what you are working with in your restoration project". ;)
If you want to get right to it, skip to part one of my step-by-step process for restoring old wood windows here.
But if you want a bit more of the backstory on why I am restoring my wood windows follow along.
The Ingenuity of Finish Carpenters in the 1890s
I LOVE the carpenters that built my house. Their attention to detail was staggering:
They hand carved the rosettes in our upstairs bedrooms.
While there are many hand-carved options available for purchase on the market today, I feel a connection and sense of place when I think about the artisan that carved our rosettes 125 years ago.

They took the time to precut window jambs with "knockout" panels.
After removing the inner stop and track (if there is one), the knockout panel gives a homeowner easy access to the sash weight pockets while maintaining a smooth finish for paint. We replaced all of the sash cords on the lower sashes upstairs a few years ago and we were the first people in over 115 years to ever access those weights.

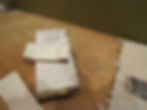
It was a bit daunting to snap the wood for the first time. But due to the precuts, they snapped cleanly and then went back together smoothly without a noticeable ridge due to the angle of the back cut. In the photo above the cut must have been a bit misaligned, which is why the small screw would be necessary to hold it in place.
During that sash cord replacement we also learned, through trial and error, that you need to clean off 100% of the paint from the pulleys or the wheels will bind and snap your sash cords again. But that's another story for another day...
They also put together all door casings like a jigsaw puzzle.
When we turned a sitting area off our master bedroom into a master bathroom, we needed to change the large cased opening into a standard doorway to accommodate the sinks and add more privacy.

We also wanted to salvage the trim and those gorgeous rosettes to keep continuity with the trim upstairs, and were struggling to figure out how to pop the trim pieces off without splintering the wood.
After a whole lot of testing with a small molding pry bar and a utility knife (old oil based paint is thick!), we found that by first removing the plinth on the lower righthand side, every other piece came out cleanly and easily.
All of the trim pieces were angled into each other, similar to coped quarter round,

And removing those pieces reveal the original wooden structure that attached to the brick walls and sat on the floor joists.

After finishing the drywall, I sourced a four panel door and hardware to match the others upstairs from an architectural salvage yard. Putting the door casing back together was a comparative cinch.

Fast forward a few years, and we've now been thinking about our kitchen remodel FOREVER. It started with a melamine cabinet delaminating and falling off the brick wall due to insufficient anchoring. It has continued its slow decline as I "explore" what's behind the bump-outs and weird plaster work (spoiler: 6" of reclaimable footprint and an unneeded plumbing vent).
We went through several designs (and firms) before finding folks that understood our desire to not just replace and modernize, but also restore elements of the original kitchen, as the current stewards of our house.
One of the most noticeable areas? The late 1980s vinyl windows.
Why I Hate My Replacement Vinyl Windows
We have the original double hung wood windows, including some that top 5' x 7', in every room of our house except the 1st floor bath / mudroom (sliding mullioned wooden windows from a converted sleeping porch) and the kitchen (these vinyl windows). While the wooden windows allow for great air flow and let in a ton of light, I cannot say the same for the vinyl windows.
As you can see in the unedited photos of my messy kitchen, the vinyl window was inset in the original wood window opening, reducing the amount of glass in the window.
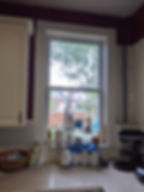
And the overall opening was shortened by 18" to accommodate U-shaped kitchen countertops. They didn't even bother to re-lay the brick or move the flagstone sill.

While the shortened openings gave the homeowners of yore more continuous counterspace, it eliminated the ability to have a kitchen table or work island, in what used to be a traditional L-shaped kitchen.
Because double hung, rather than casement windows, were used in the replacement, the lower sash is too tall to open and close without standing on a chair.
And adding insult to injury, squirrels had chewed through the screens and the sash springs were broken long before we purchased the house. Plus, if I am being honest, I just don't like the look of the vinyl windows compared to my pretty wood windows (even if they need a new coat of paint, :|) shown on the left.

Now that you know all of my reasons for wanting to bring my old wooden windows back to life, let's get to it!
Step 1: Remove the Window Trim and Assess the Damage
To figure out what we were working with -- Were the sash weights still in their pockets? Were the pulled hidden behind a second jamb? etc -- I first had to remove the replacement trim.
Because this trim was builder-grade from Home Depot with a single coat of latex paint that did not match the rest of the kitchen trim, demo was less precise and moved fairly quickly.
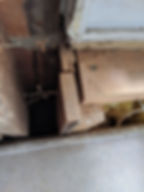
I could see that there was a 2" wide piece of wood covered in construction adhesive behind the painted jamb. I was hoping that it was a shallow piece that was just "hiding" the original window jamb. Or, maybe the window was even bigger than I thought and the original piece of lumber shown on the left was actually the jamb, and the mortar and brick had somehow fallen into the pocket on the far left.
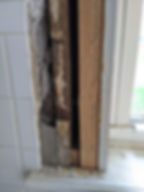
Unfortunately both sets of wishful thinking were wrong. The 2" wide vertical piece was a 2"x4" piece of lumber, installed so that the window replacement folks had something to which they could nail their new jamb. And the original wood was actually the far outer frame or lining separating the brick wall from the overall window casing.

As you can see on the top rail (with some of the original paint), the original jamb used to be slotted into the top and it was cut out. I'd regain a couple of inches of glass width on either side of the window, but it would be a lot more work -- so not very good news up top.
After removing the backsplash tile and newer stool, I peered down into the sash cord pocket. Again bad news -- the sash weights were missing. But one small joy -- the jamb was cut horizontally above the pre-cut "pocket" for the weights. So in the rebuilding process I can try and reattach a new jamb to the existing pocket, or I can use those precuts as template for how I should re-mill the bottom portion of an entirely new jamb.
So while I knew I had a rebuild ahead of me (and some additional research in how to route out grooves for the pulleys), I still wasn't sure what was going on with the inner stool because the lower cabinets and countertop were obscuring the original woodwork below.
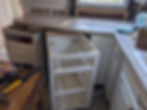
Step 2: Remove Lower Cabinets and Laminate Countertop
Laminate countertop removal counts as one of the most challenging things I've ever done because I needed to save the connecting countertop without uninstalling my entire kitchen and undoing the plumbing to my nearby sink. I wanted to keep the cabinets in workable order, both as a temporary, functional solution and so that they could be donated to Habitat or Bud's Warehouse in the future.
A quick look with a flashlight and a pry bar revealed that the corners of the countertop were held together by a series of miter bolts that were inaccessible from inside the corner cabinet; inconveniently, that cabinet had a "ceiling". After several hours unscrewing all horizontal screws connecting the cabinets together and carefully rerouting some electrical, I sequentially removed each of the "U" cabinets.
Pro tip: some of the horizontal screws connecting the cabinets are frequently located BEHIND door hinge hardware. So if you pry and they don't budge, completely uninstall all hardware first to find the offending screw(s). That one took me 2 hours to figure out -- you're welcome.
Once I had the two smaller cabinets removed, I then supported the countertop while prying off the corner cabinet ceiling and walloping on the left sidewall. That gave me enough access to remove the miter bolts and take off the countertop.
Needless to say, that sucker sadly ended up in the landfill. But was able to move the base cabinets back in place to provide temporary storage and more easily access the window in question.

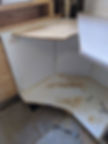
In the photo above, you can see the backcut for the left sash weight pocket. So now we have access to everything we need to start restoring the window.
Step 3: Source and Refinish the Sashes, Pulleys and Weights
As a lead up to the project, I contacted several reputable window restoration companies. They were all willing to build me entirely new reproduction wooden windows, or build storm windows for my entire house (a future hope once I've saved my pennies), but weren't willing to take on a minor two-window project.
Thank goodness one of them referred me to John at Glacier Glass. John was also too busy to take on the project, but in true "your dad and grandfather are a wealth of knowledge" fashion, he acted as a cheerleader and advisor by text during the deconstruction phase.
After measuring the window opening multiple times, I realized that I had another window exactly the same size with the original sashes -- my living room window featured in the comparison photo earlier in the post. So I measured those sashes and off to the salvage yards I went.
Thankfully I found the perfect sashes with the same reveal in the back lot at the Salvage Design Center. They were in rough shape and had been tagged with stickers from Andersen (who must have done the window replacement in someone else's home).
But after several rounds of sanding, patching with wood putty, painting with exterior oil-based primer, and reglazing with putty and glaziers' points, they looked spectacular. All they are waiting on is a finish coat of oil-based paint in my preferred trim "white", Benjamin Moore's Marscapone.

The overachiever in me sourced four sashes -- two uppers and two lowers thinking that I might be able to run the full-height double hung window BEHIND the countertop and my beloved 1929 farmhouse sink, but I've since given up that ghost and settled on a casement window. I am still holding out for stained glass in that casement window :)
While I was there, I also sourced pulleys to match the rest of the house (remember: you need four (two for the top, two for the bottom) and sash weights.

The folks at SDC even let me stand on an old scale to ensure the weight markings matched the actual weights and hadn't been previously cut down for a more precise fit. I followed Google's best recommendation on subtracting 2lbs from the upper sash weight (and dividing by two) to keep it closed and adding 2lbs to the lower sash weight (and dividing by two) to make it easy to open. Again, I purchase four of them -- two weights for each sash.
I hauled the lot home and refinished the window sash hardware too.
Step 4: Dry Fit the Window Sashes
Now that I had the window casing completely open I went to dry fit them before building the jamb. I put the bottom one in -- a perfect fit.
I leaned it against the existing window and then try to hold the upper sash in place. The width was good, but craaaaappppp; there was a gap between the sashes.
Long story short, I had mis-measured.
It turns out that in my haste, I had written down the overall width and height of the opening. But when I measured the living room window sashes and the width exactly matched, I somehow disregarded the height. I mistakenly assumed they must be exactly the same.
If you look closely at the exterior again, you'll see that the kitchen window is a couple of courses of brick taller than the living room window, as evidenced by the relief at the top. *Sigh*

So I now have a couple of options facing me:
Option 1 - Source or build new sashes. I am loathe to do this given the time involved in finding and refinishing the first set. But I may still go this route as it's the most prudent option to take.
Option 2 - Adjust the window opening to accommodate the 5" gap. I am also wary of doing this because I want to try to remove the wooden panel that was inserted before. But I have been researching extra deep stools and sills -- apparently many of these are non-standard anyway, as evidenced by the 1"-2" sills that I can find on my own windows. So I am going to play around with that option as well as a more balanced filler on both top and bottom as a way to account for my mistake.
Update: unfortunately, the kitchen window frames were not salvageable. But you can still follow along with "part two" on my window restoration, which shows you how to uninstall a window sash and replace the sash cords.
Looking to source stained glass or wooden sashes for a double hung window? Contact Denver Squared and we can help you find the perfect piece.
